3. Getting Set-up
3.1 Vehicle Access
Minimal's Pedal 4 uses an NFC fob for turning the vehicle on or off. The same fob can also be used to open the cargo doors. The NFC fob will have been provided along with the vehicle.
There are various access permissions that can be granted to users depending on their role within the organisation. Each fob can be granted with access to either a specific vehicle, multiple vehicles, or the whole fleet - access rights can be modified using the minimal fleet app.
If you do not have a key for your vehicle, please contact your employer and/or Minimal.
3.1.1 NFC Fob Identification


- Minimal logo.
- Key fob serial number, CE conformity mark & WEEE mark.
- Lanyard hole, to secure keys on lanyard or keychain.
Attention
Please take care of your Minimal key, theft of the vehicle could occur by losing a key fob. If you have lost your key please speak with your employer or contact Minimal for a replacement.
Attention
Please ensure the vehicle is turned off when exiting the vehicle to prevent unauthorized access and theft.
3.1.2 Types of Pedal 4 Access Permissions
If you are unsure as to which access permissions your fob has, please speak with your employer to understand what access type you have been granted.
- Assigned vehicle access - Your key fob will unlock and start only a specific vehicle. You will be notified of your assigned vehicle by the fleet coordinator.
- Key specific access - Grants access to multiple vehicles via an online vehicle management portal, contact your assigned fleet coordinator to understand which vehicles you have access to.
- Full fleet access - Grants access to any vehicle in the fleet. This access is typically reserved for supervisors, service technicians, or shift leads.
Attention
Always lock the vehicle when exiting to prevent unauthorized access and theft.
3.2.1 Operating the Minimal Pedal 4
In order to operate the Minimal Pedal 4 in a safe manner the following instructions should be adhered to.
Note - Switching between forward and reverse
- To switch between forward and reverse modes, you must come to a full stop.
- Once stationary, pedal backwards to engage reverse mode or pedal forwards to continue in forward mode.
Note - Turning
-
Turning the Pedal 4
Turn the handlebars left to go left, and right to go right. Steering angle is limited to 48.5°. -
Sharp turns
Be aware that the Pedal 4 has a turning radius of 4.6 meters. To avoid oversteering plan manoeuvres accordingly.
Caution
Turning radius should be accounted for in tight turning environments to avoid damage to vehicle & environment but to also avoid injuries to self and the public.
3.2.2 Cabin
The cabin holds the controls to the vehicle including handlebars, switches, seat and pedals. The following shows their respective location within the cabin:
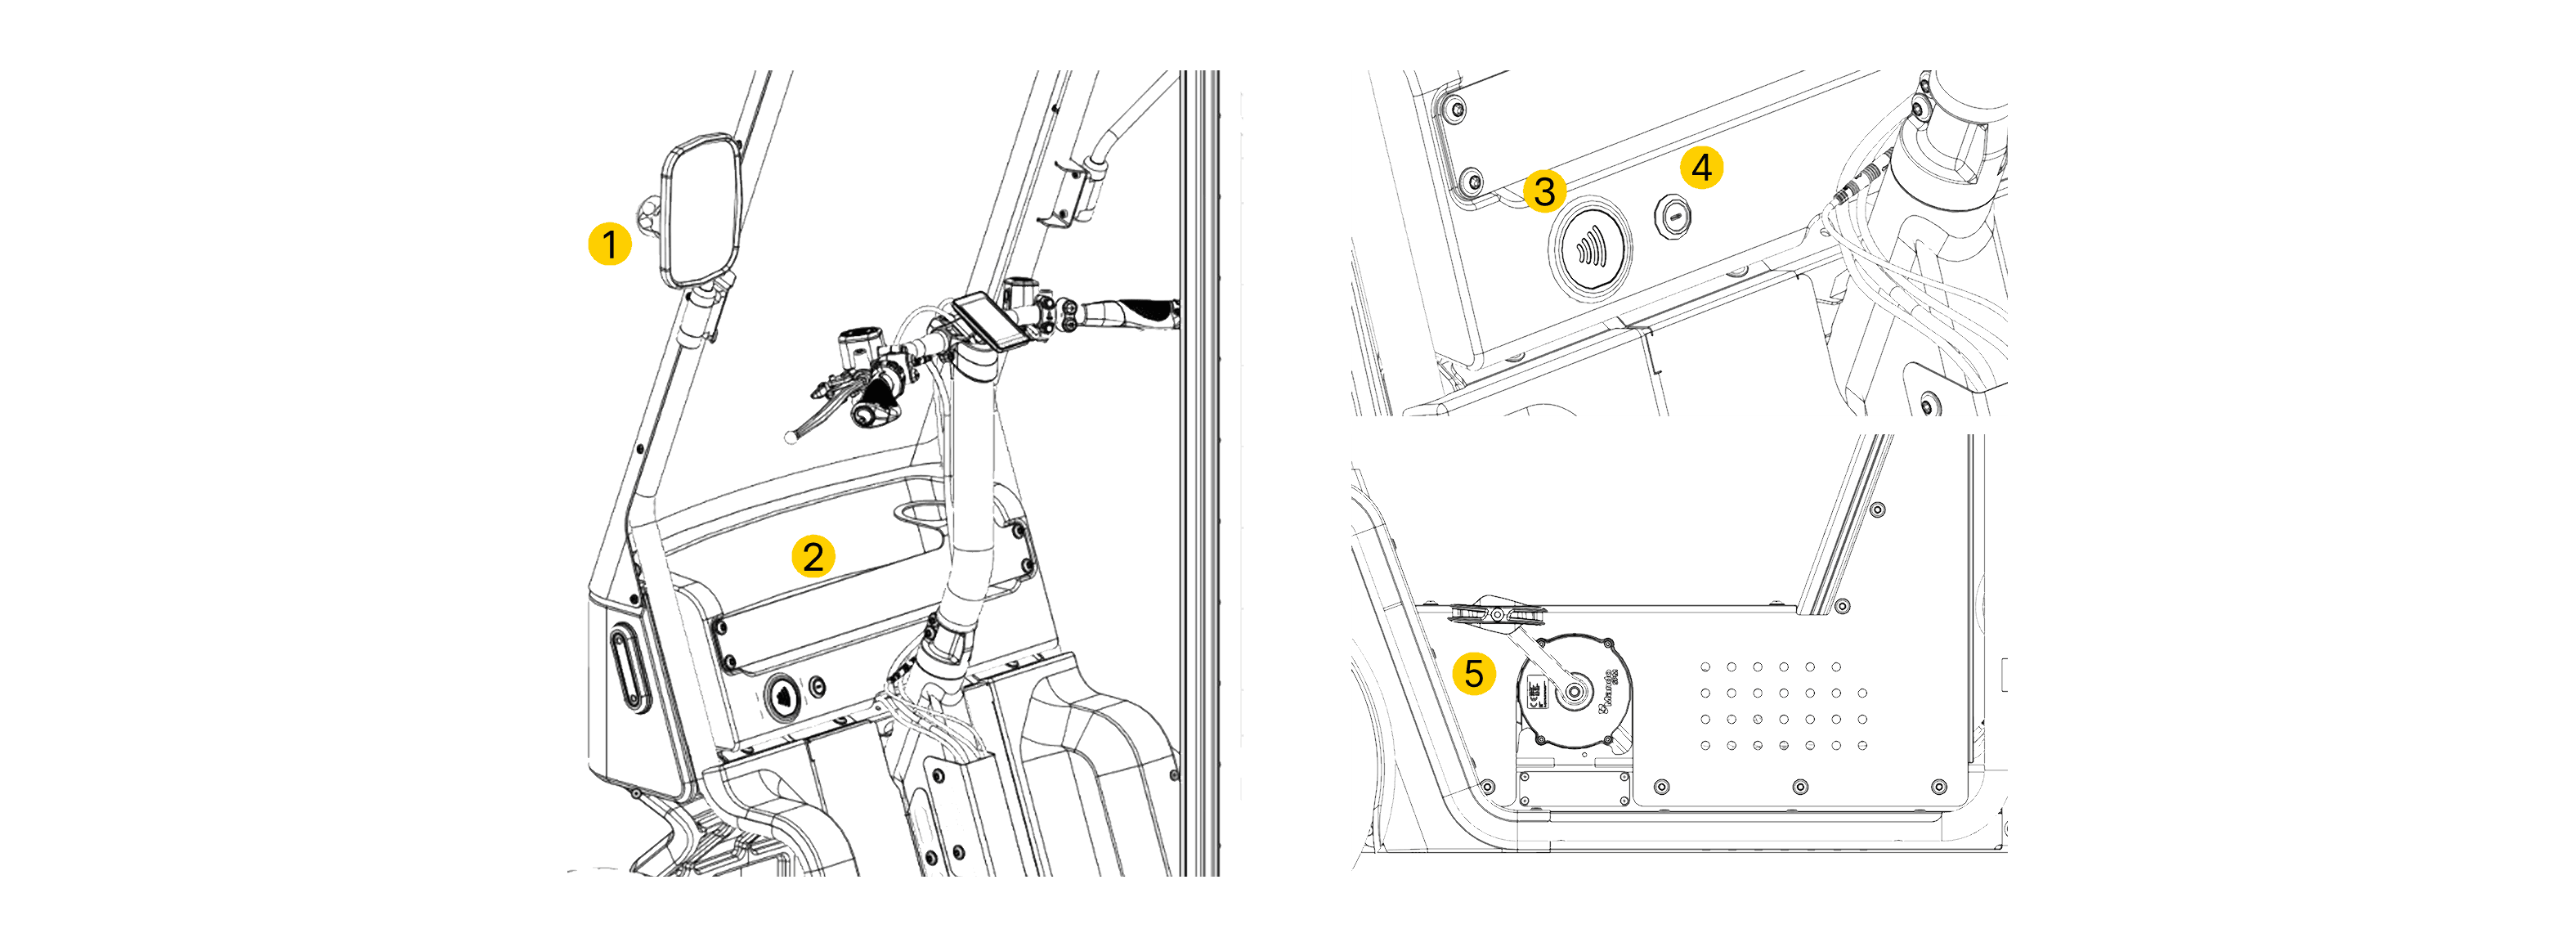
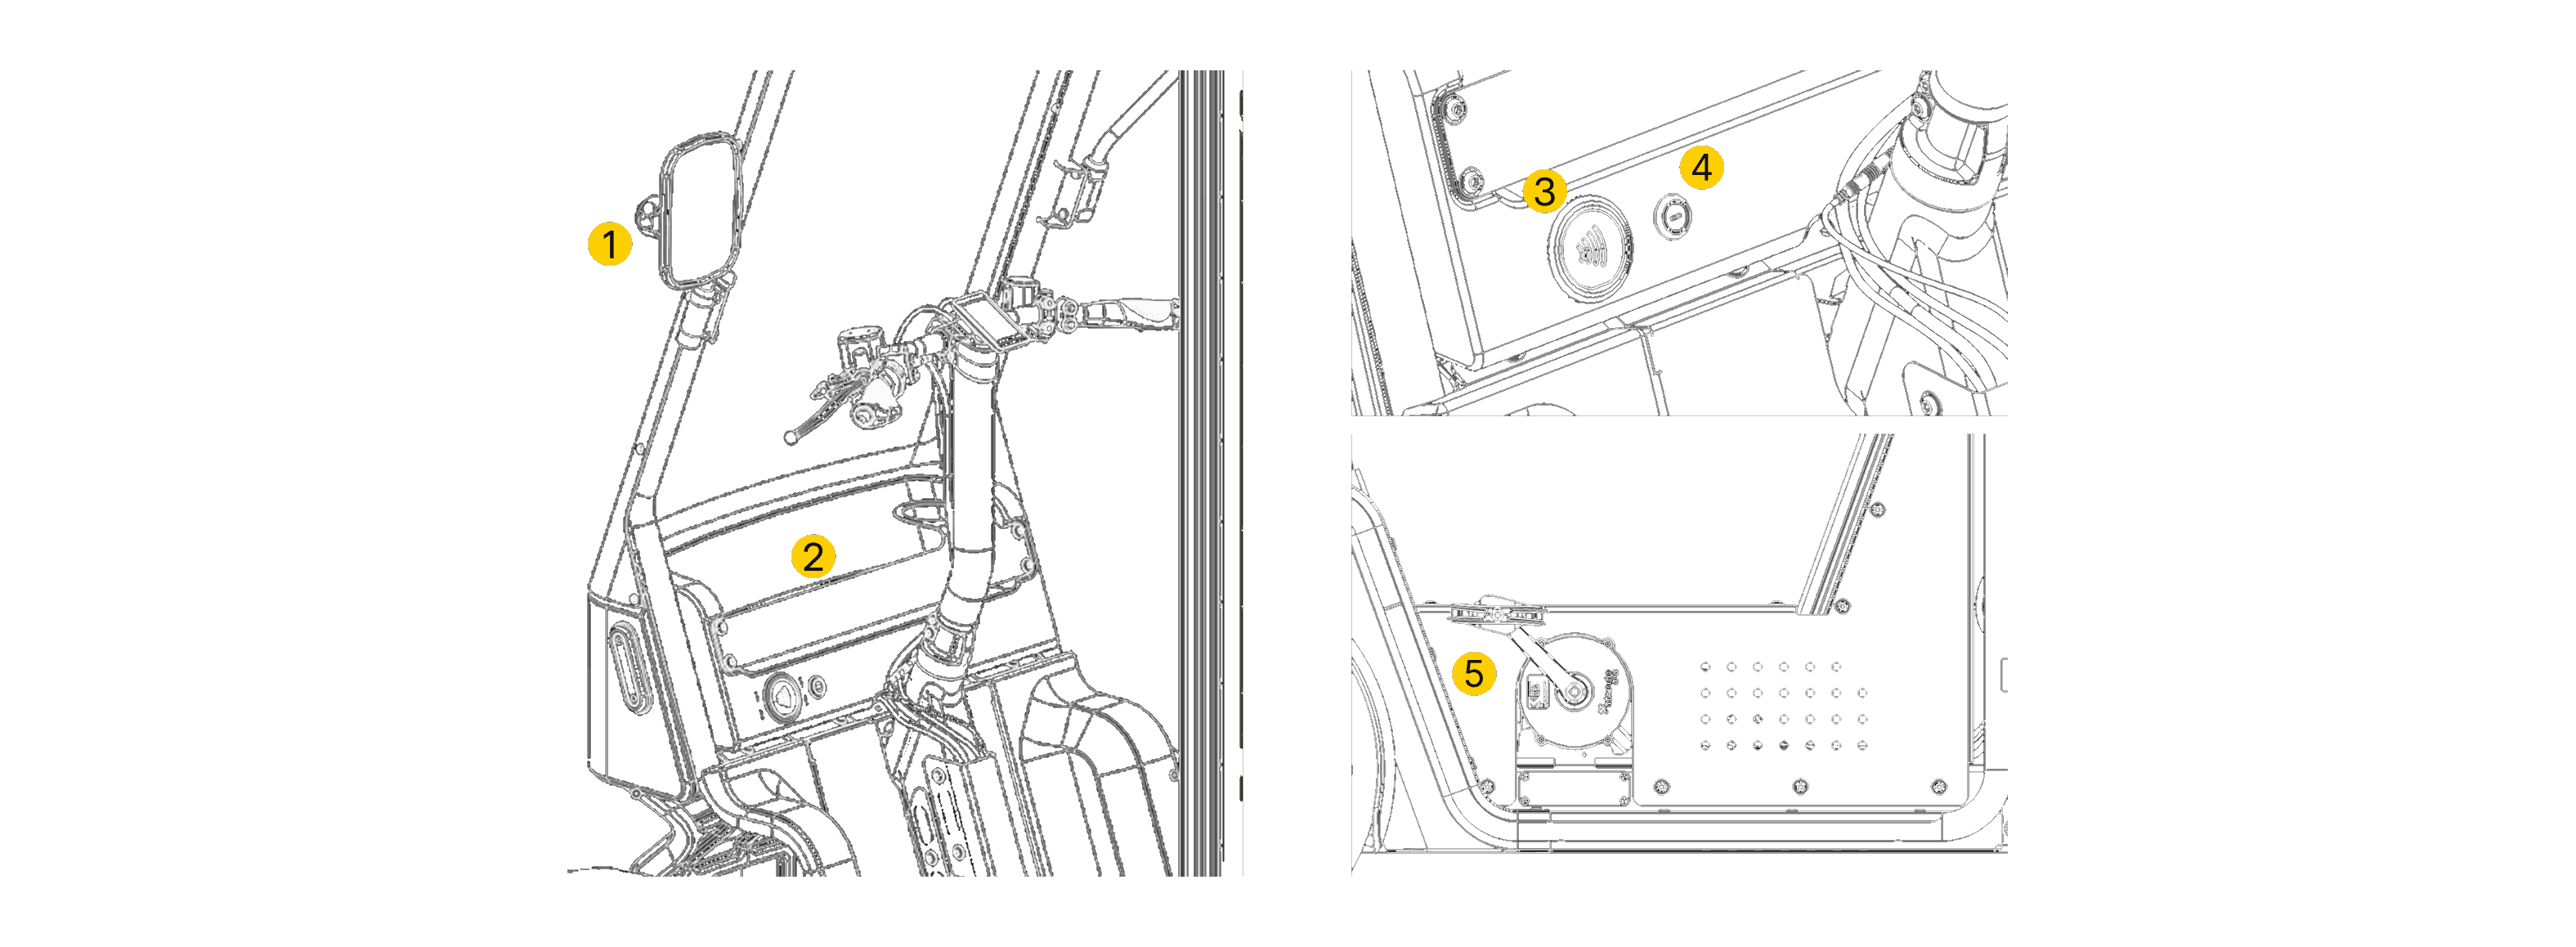
- Side Mirrors - Adjustable left & right side mirrors, please see "Pre-Journey Checklist" for how to adjust.
- Cabin Dashboard - Used to store personal items and drinks with an included cup holder.
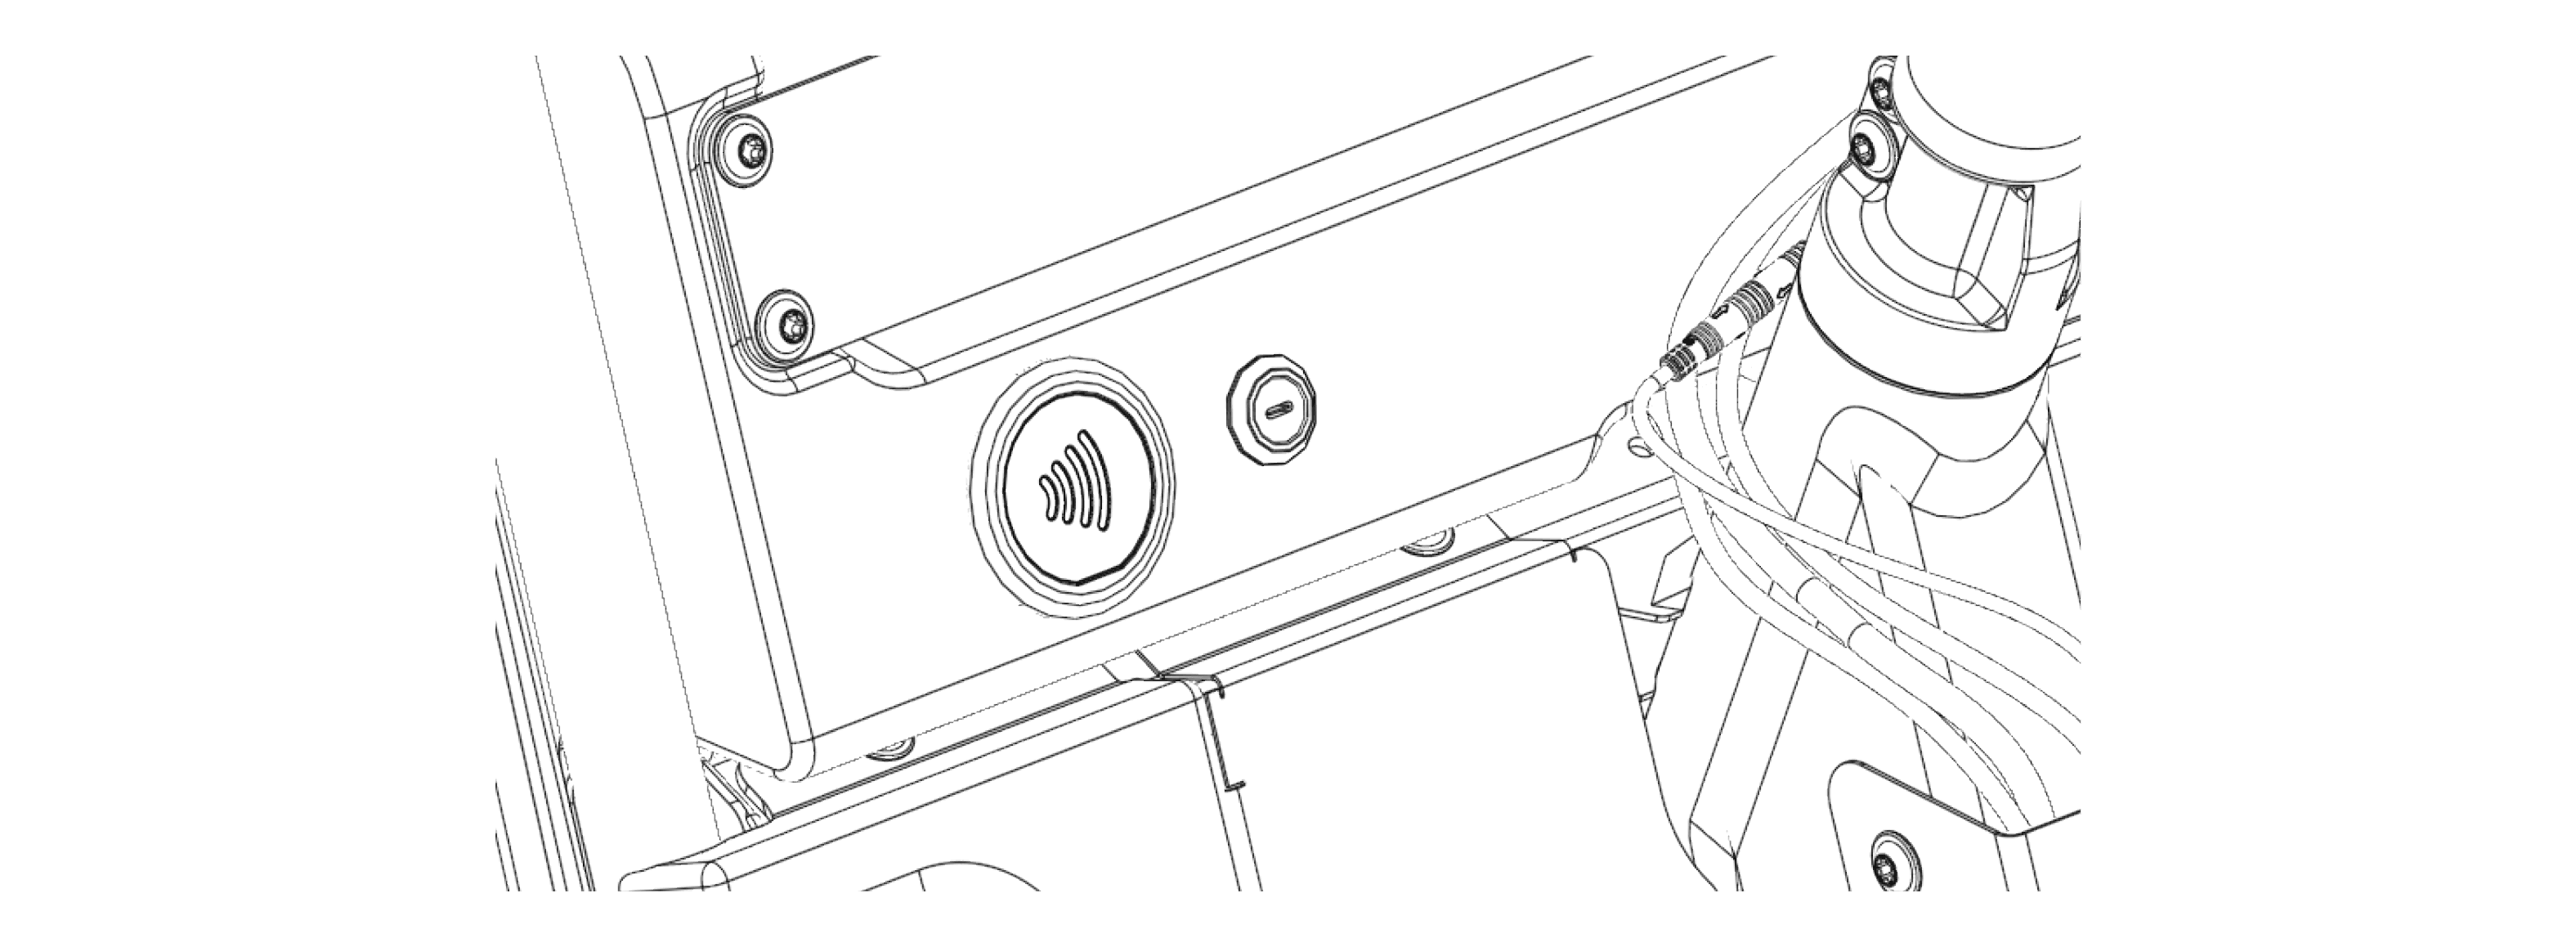
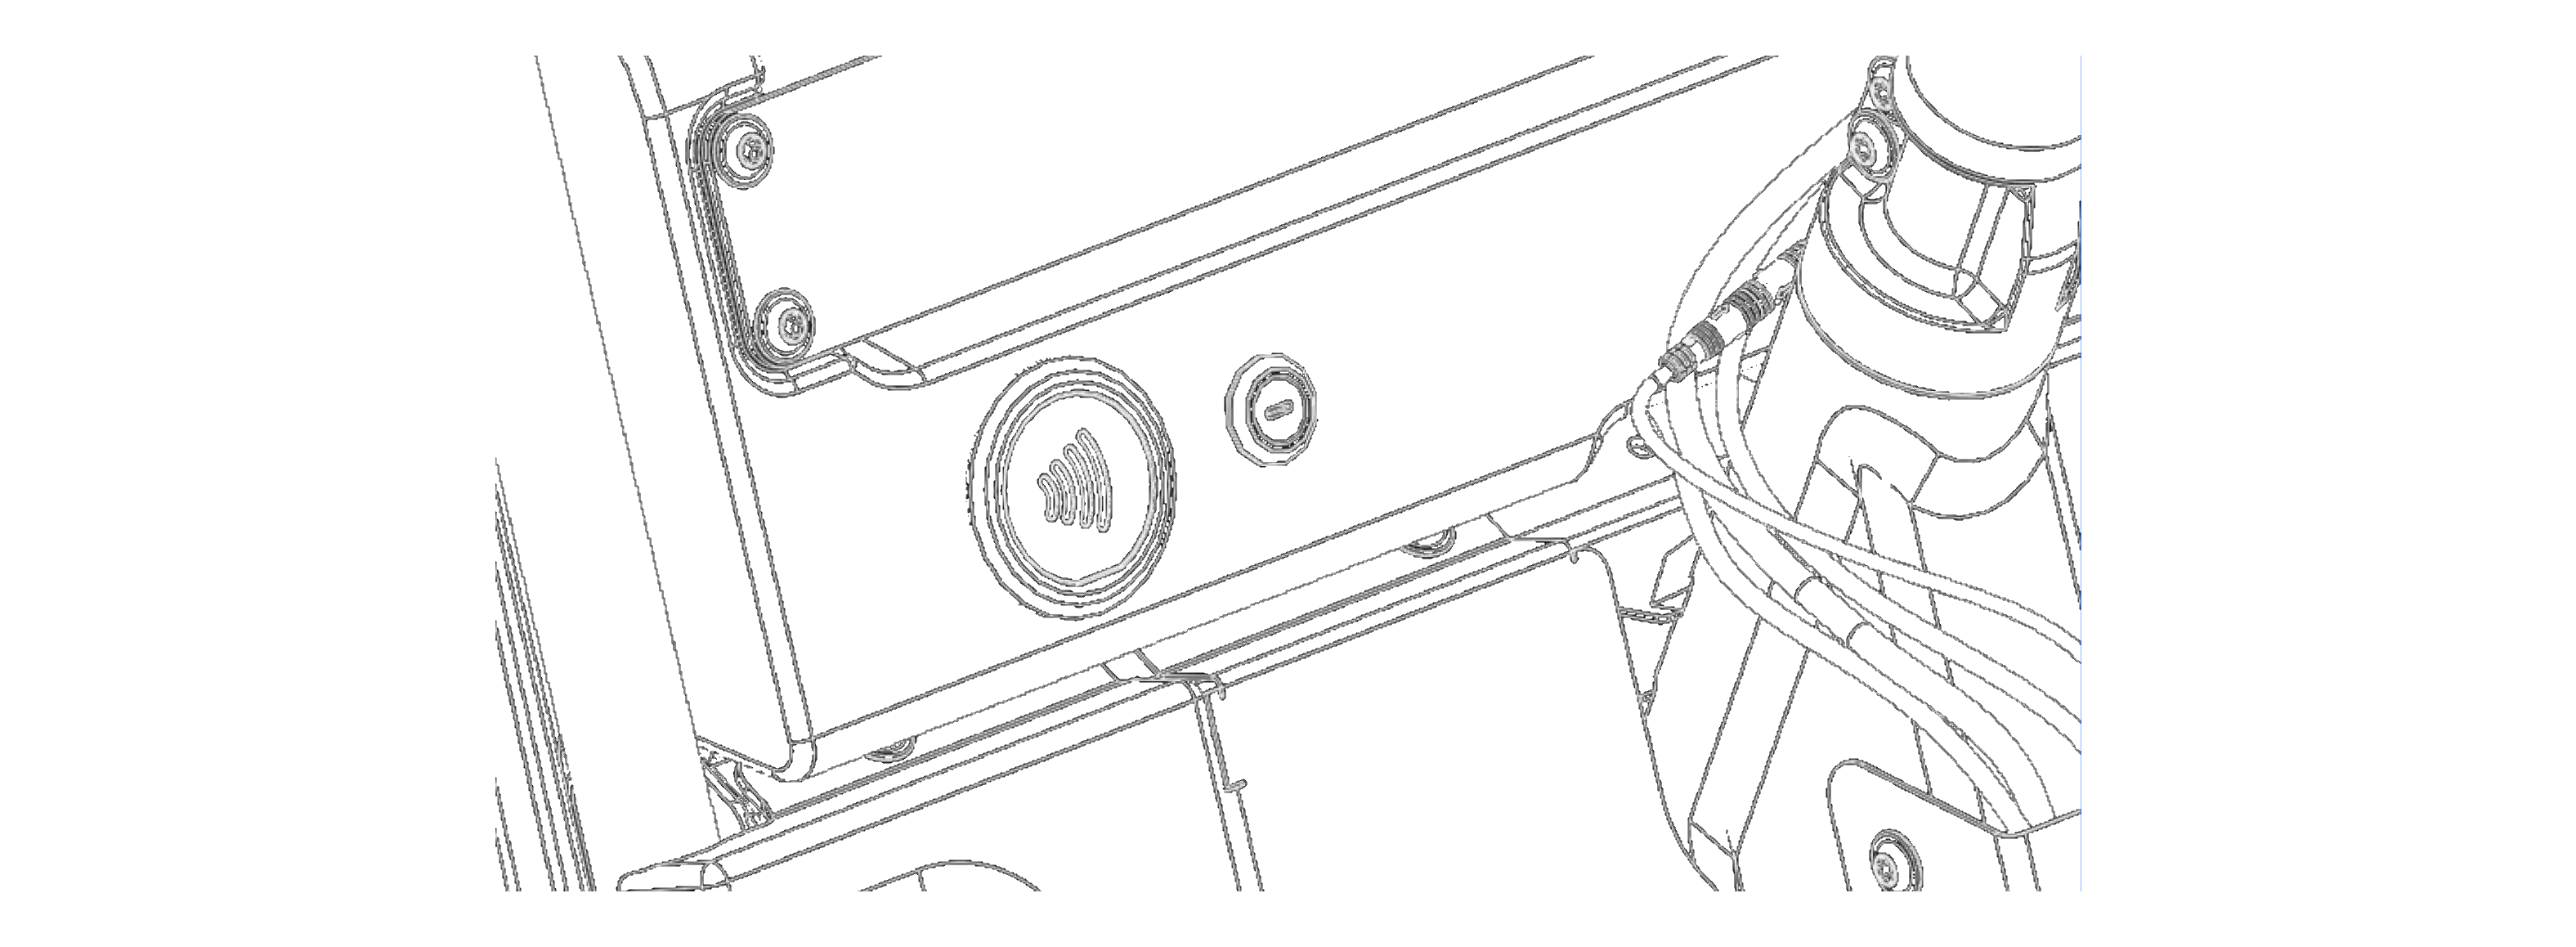
- Dashboard key reader - Tap your NFC key fob here to turn the vehicle on/off.
- USB-C Charging Port - Can be used to charge personal devices such as phones and tablets (blanked off if usin external wireless charger)
- Pedals - Used to control the power delivered by the vehicle's motors
3.2.3 Handlebar Controls
The controls on the handlebar should be used when manoeuvering the vehicle to alert traffic to your intentions.
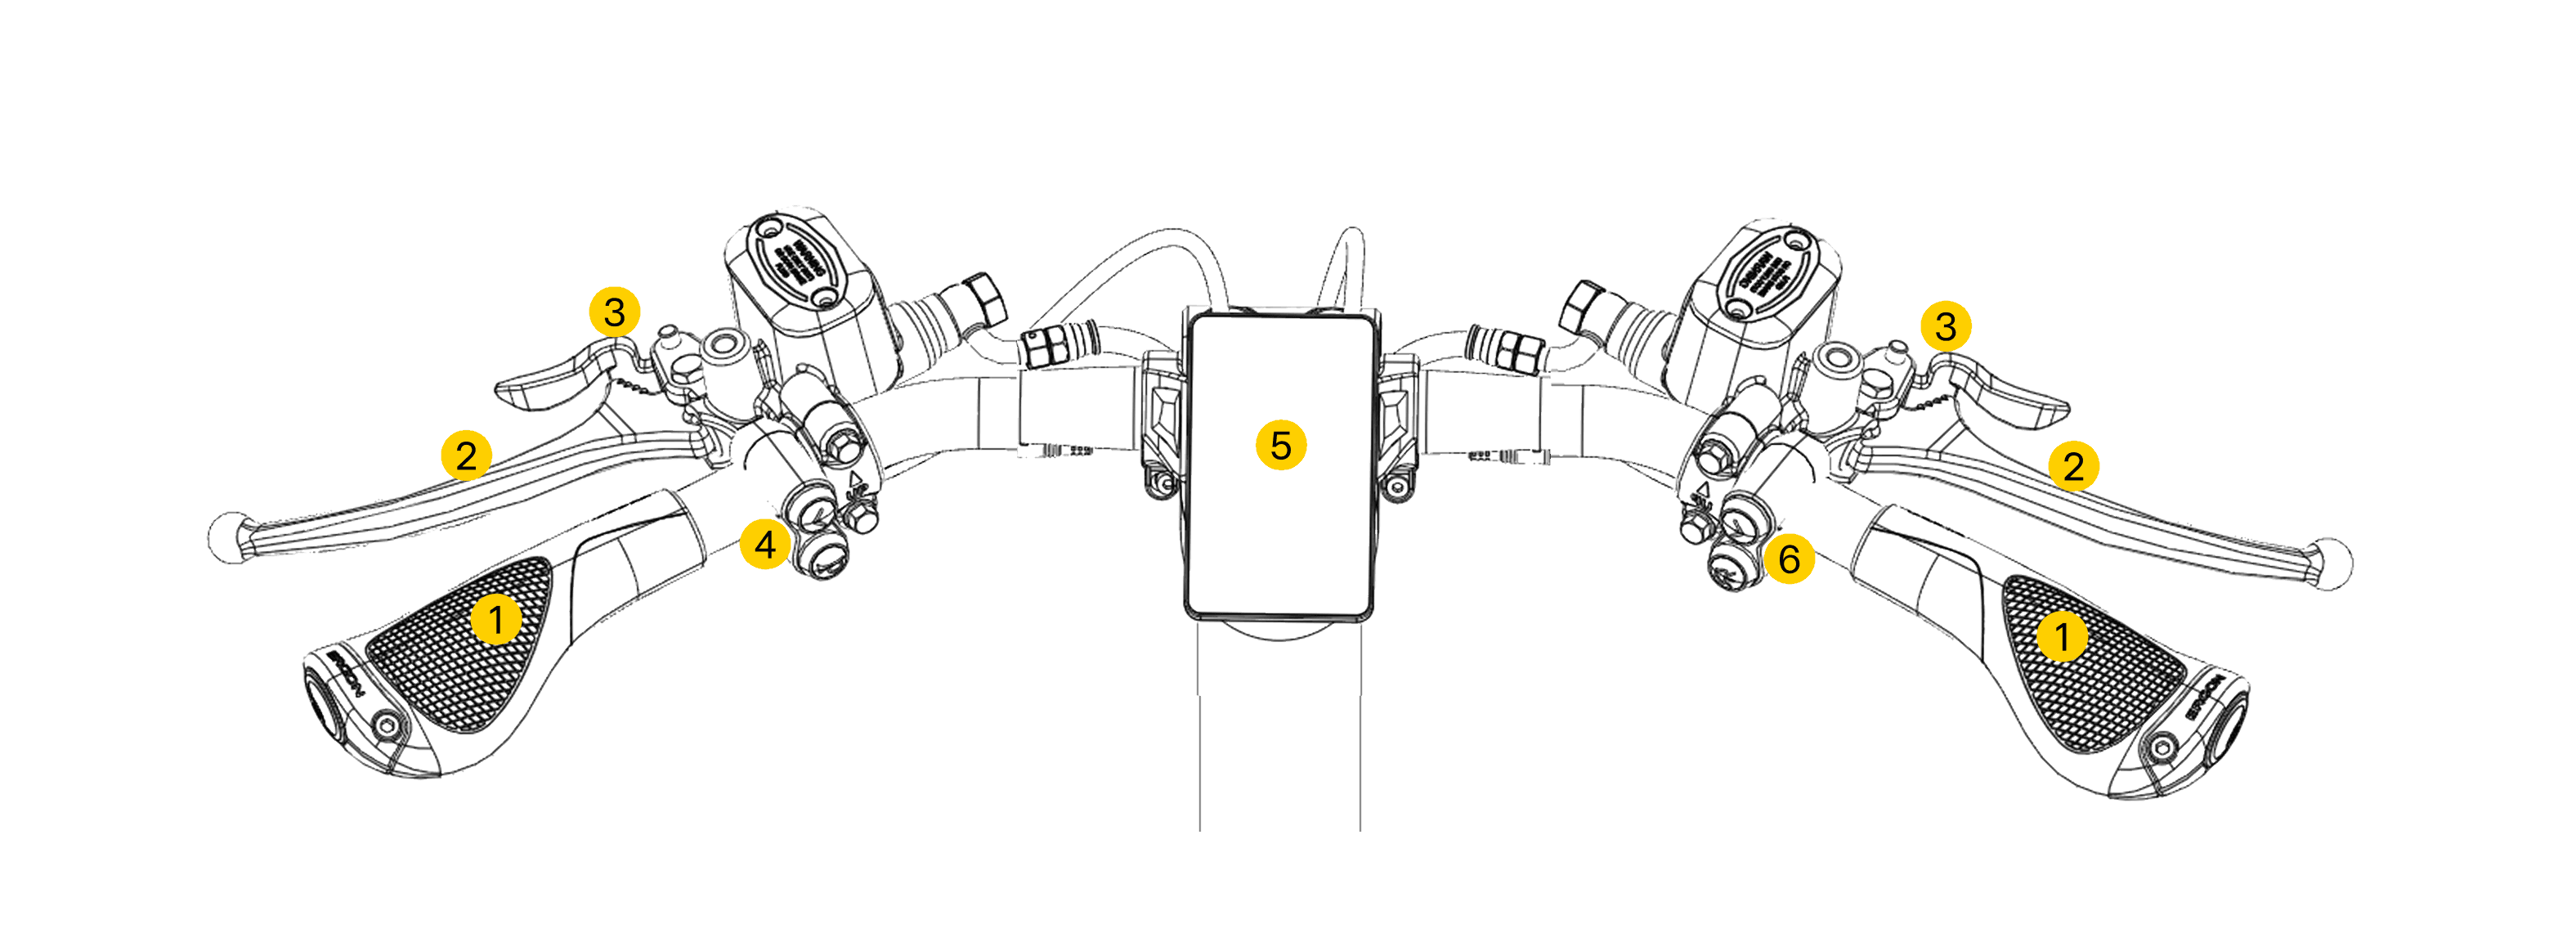
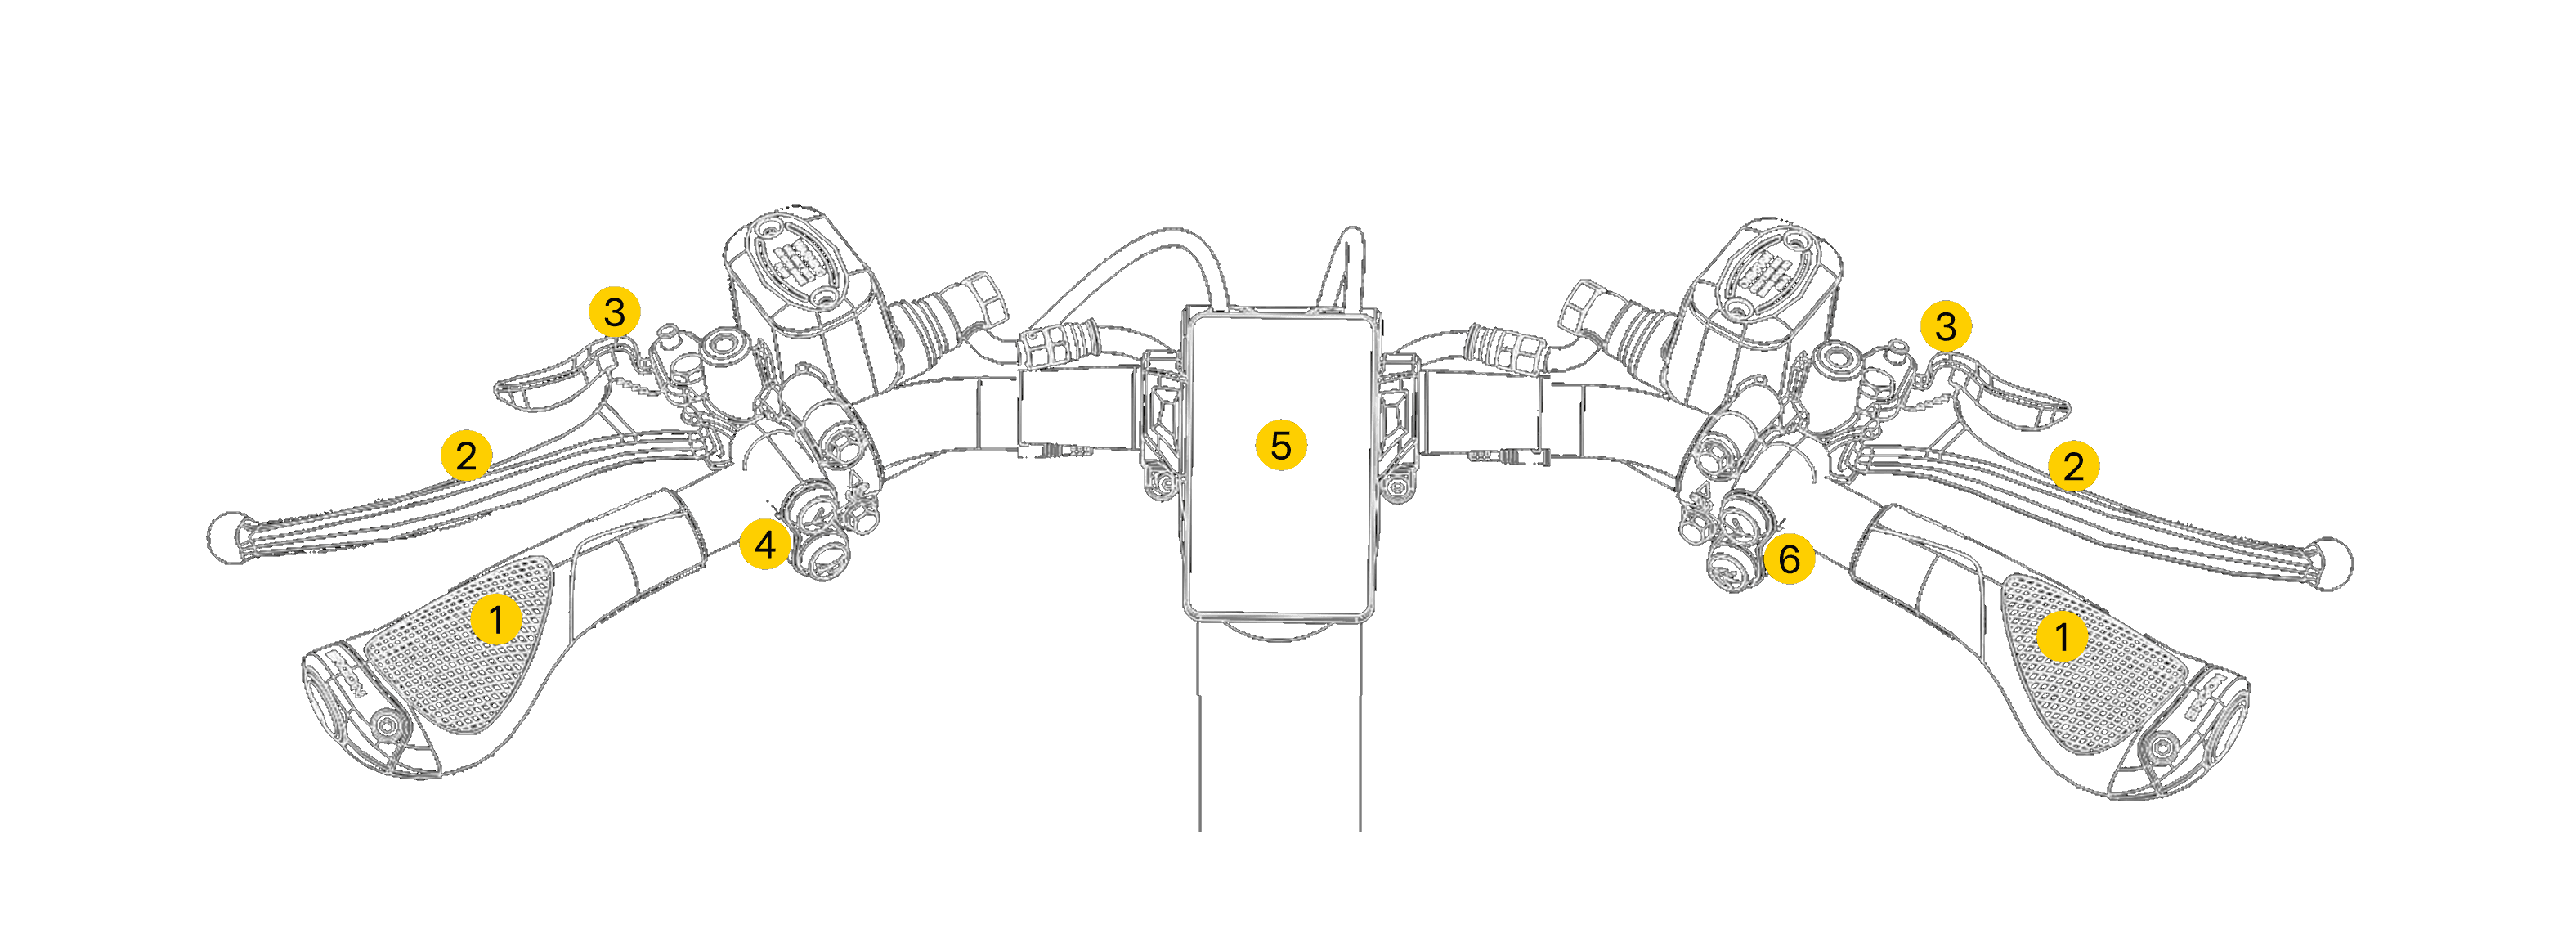
- Left & right handlebar grips.
- Left brake lever (rear braking system) & right brake lever (front braking system).
- Brake lever locks - Used to hold brake levers in the engaged position when parking.
- Left Button pack - Includes left indicator & horn buttons.
- Handlebar stem - Includes the vehicle display.
- Right button pack - Includes right indicator & high-beam buttons.
3.2.4 Brakes and Immobiliser
The Minimal Pedal 4 is equipped with independent front and rear hydraulic disc braking systems, each of which is operated by a dedicated lever on the handlebars. The vehicle is configured in accordance with the UK bicycle brake lever convention, so that the left lever operates the rear brake and the right operates the front brake.
To keep the brake levers engaged when parked, the brake lever locks can be used. To engage the locks, pull the levers and then pull the locks into place. To release the locks, pull back on the brake levers and the locks will disengage.
The vehicle has an immobiliser system which ensures the brakes remain applied when the vehicle is turned off and so help to prevent theft of the vehicle. The immobiliser is automatically engaged when:
- The vehicle is powered off, and;
- Both the left and right brake levers are applied
Once the immobiliser is applied the vehicle's brakes will remain engaged even if the brake levers are released from their locks. To release the immobiliser the vehicle must be unlocked and the brake levers both released.
Caution
If the vehicle is locked without the brakes being engaged, the immobiliser will not activate and the vehicle will be able to move freely, potentially causing injury or damage.
3.2.5 Display
The vehicle's display unit is used to show:
- Vehicle speed
- Total distance travelled
- Battery charge
- Any warnings or errors which occur.
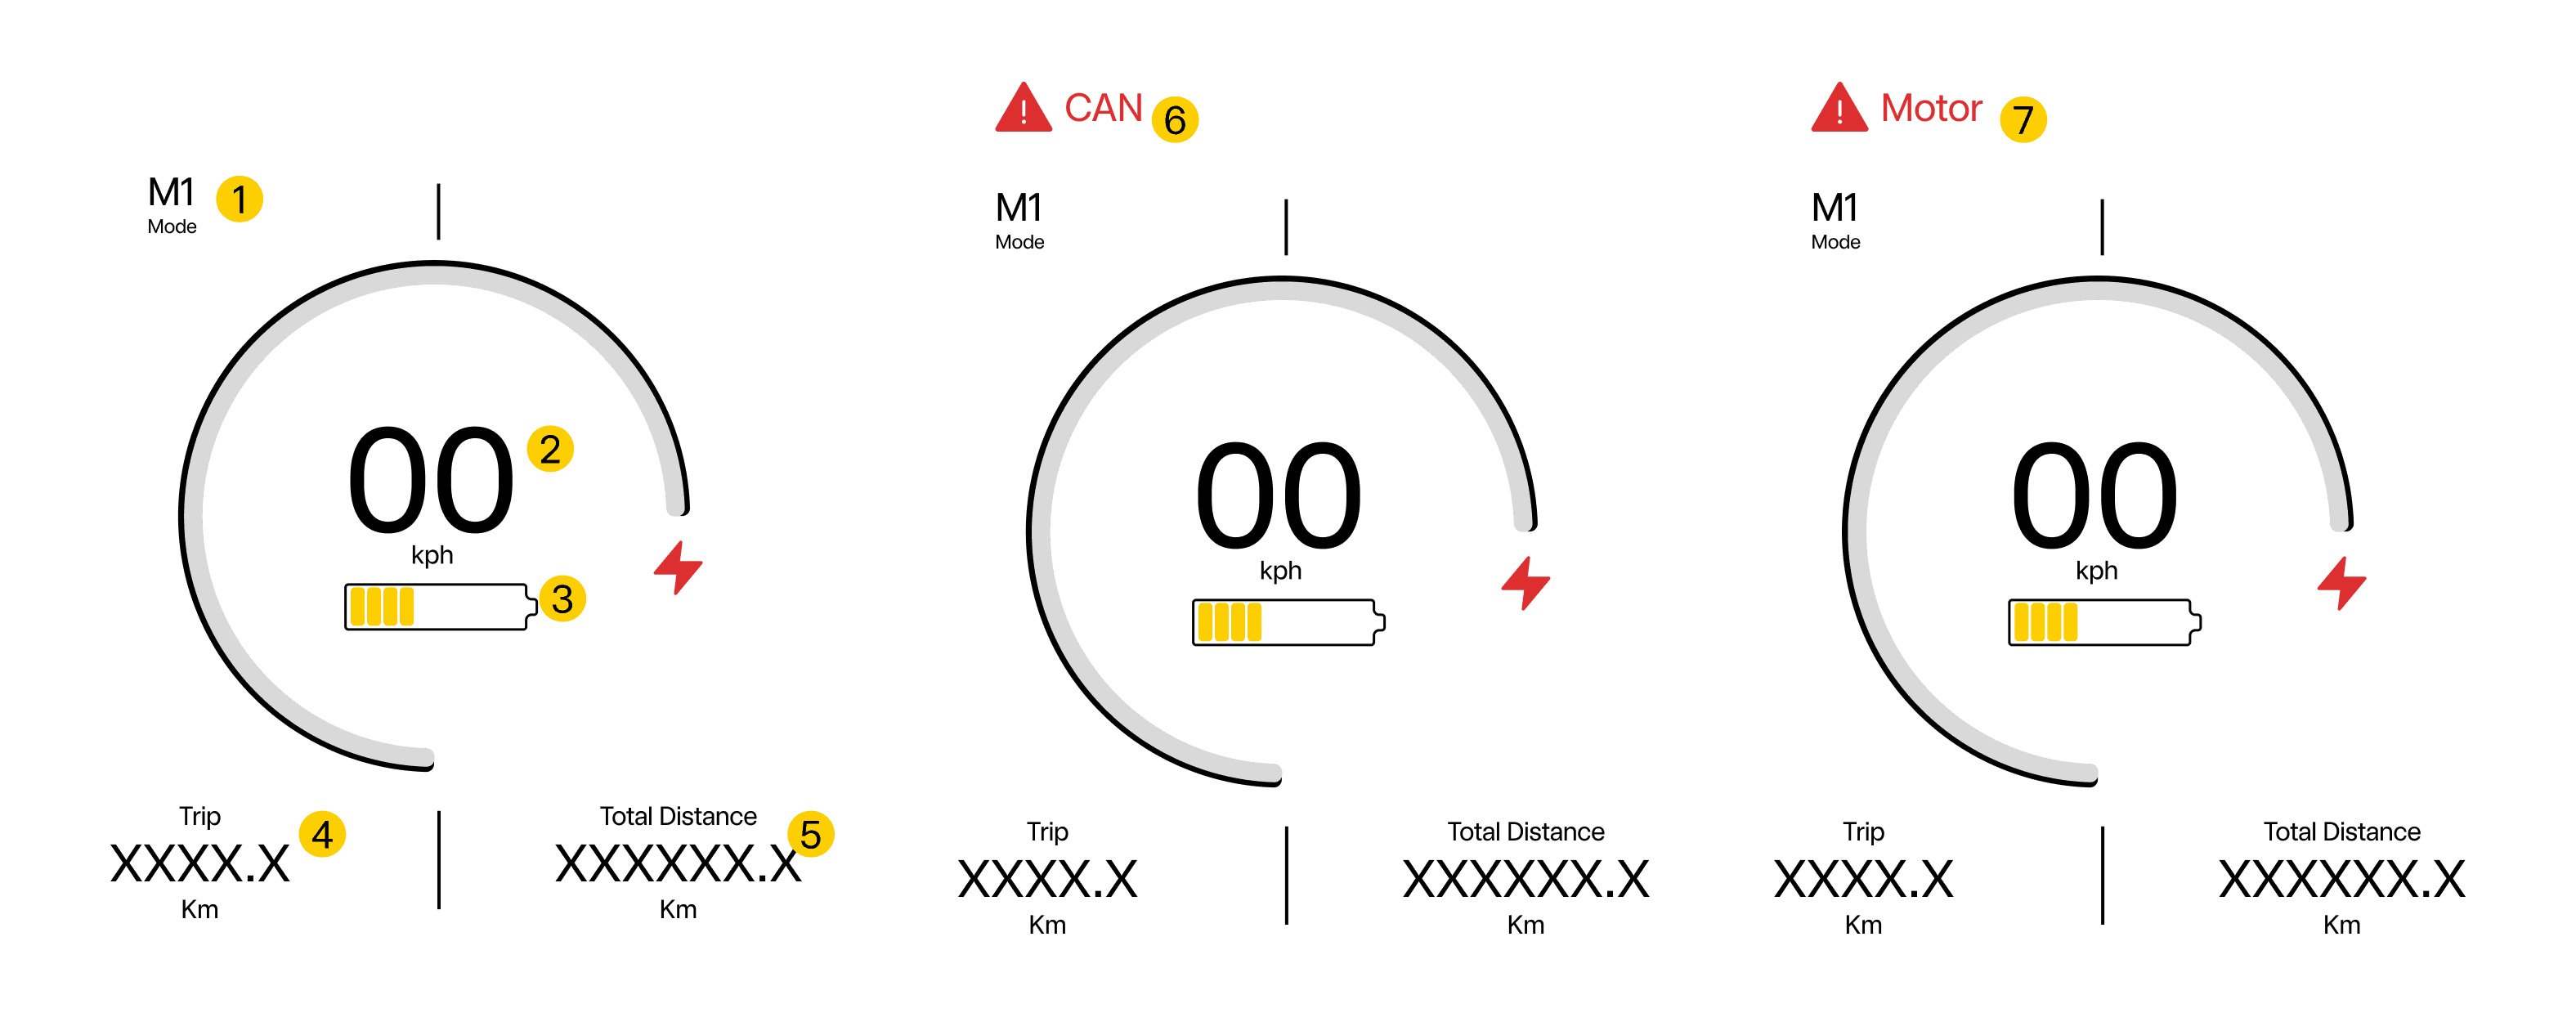
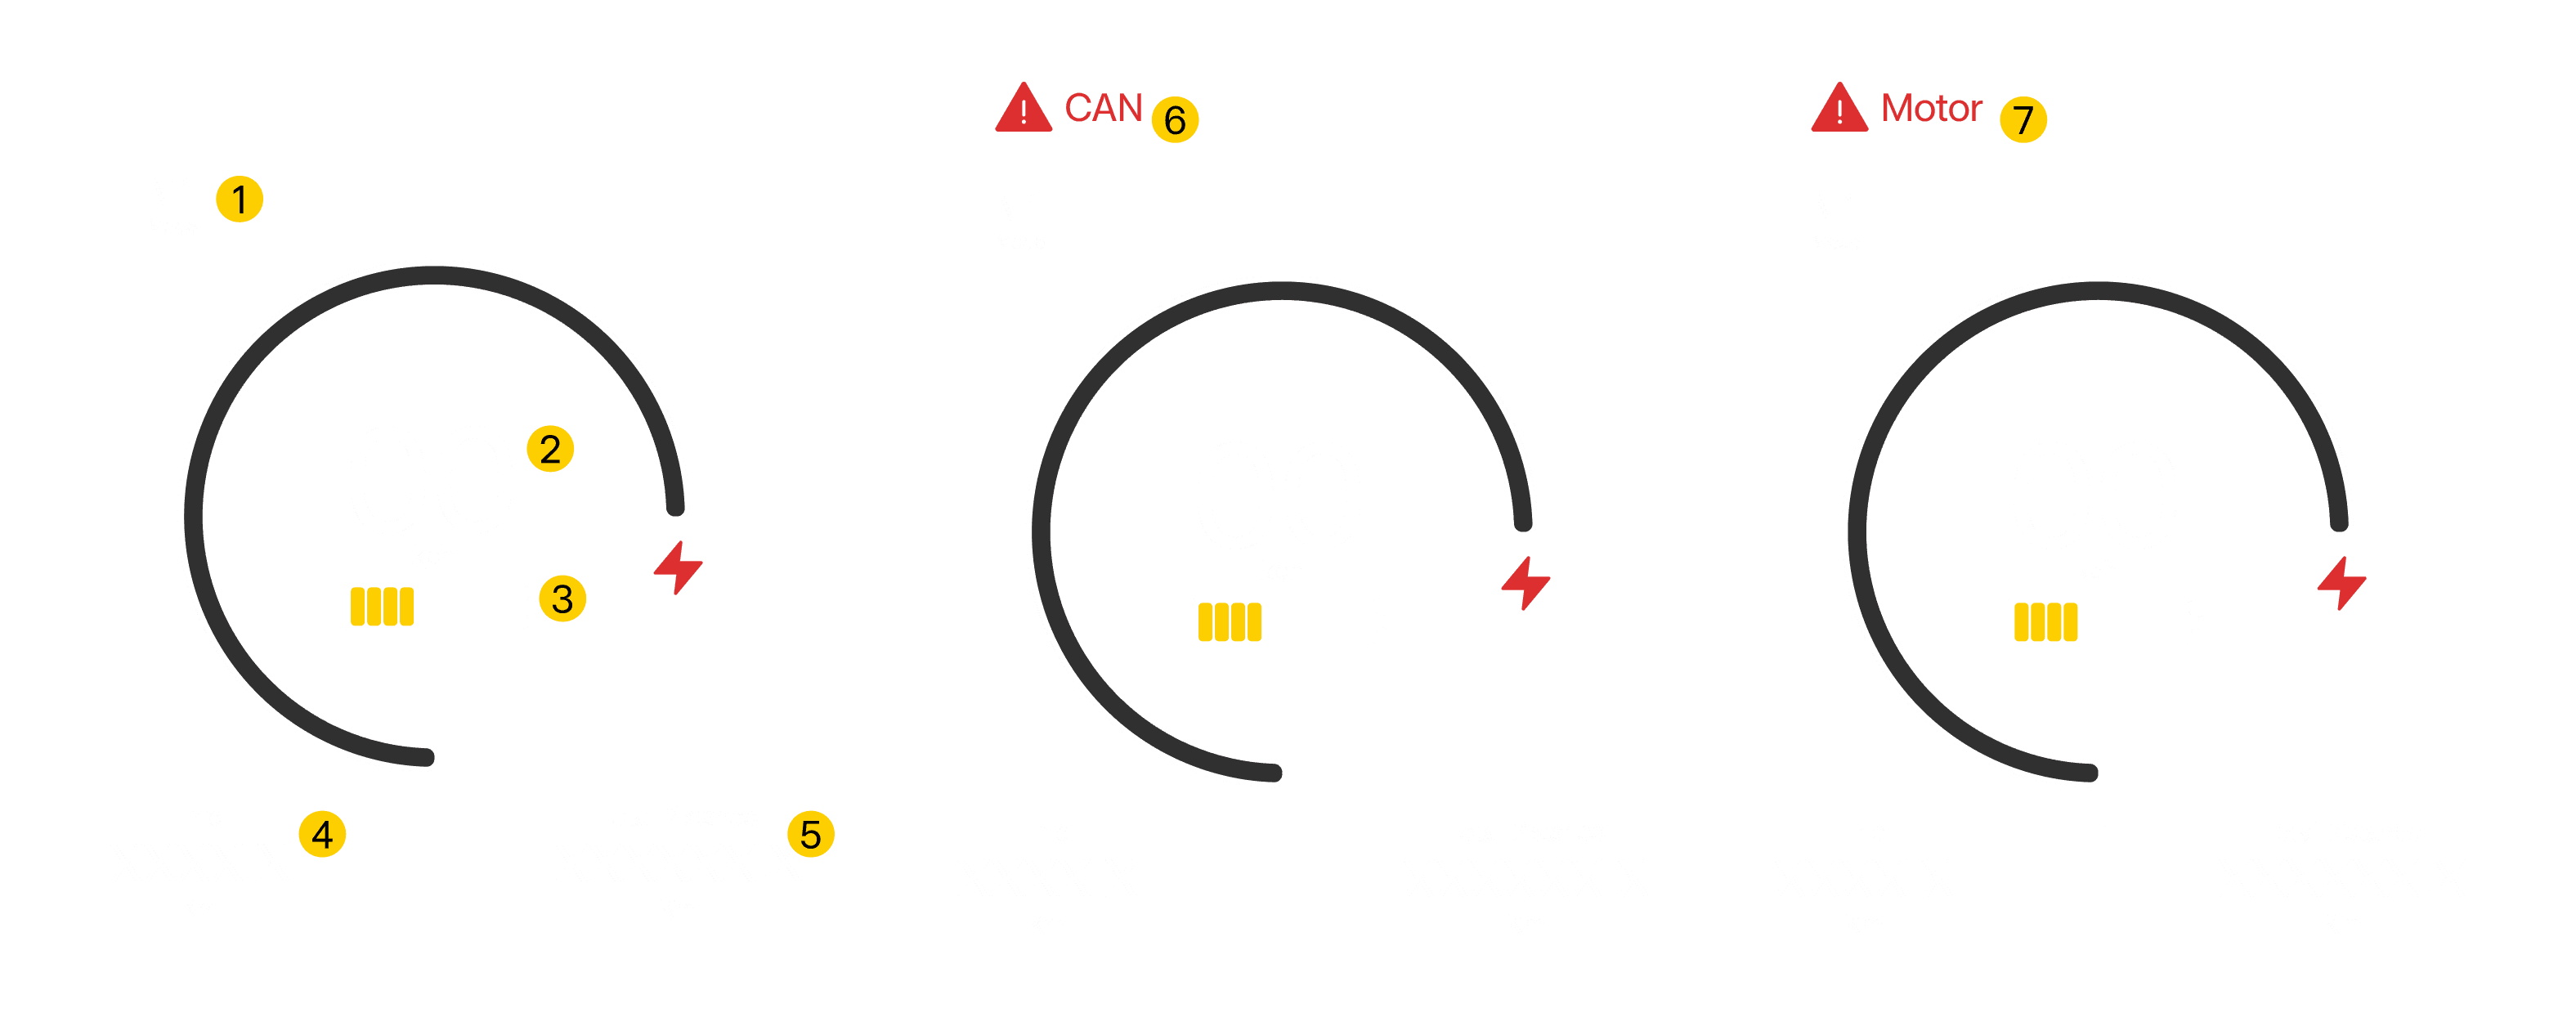
- Mode - States what mode the vehicle is in. Currently the Pedal 4 has two modes, M1: Forward & R: Reverse.
- Speed - Displays the instantaneous speed of the vehicle.
- Battery Level - Displays the level of charge in the battery.
- Current Trip Distance - Displays total distance traveled by the vehicle throughout its lifetime. (current trip distance is not functional in this version)
- Total Distance - Displays total distance traveled by the vehicle throughout its lifetime.
- CAN Error - Is displayed if a CAN bus error occurs in the Mando SPM Powertrain system. (See Section 19 for emergency procedures).
- Motor Error - Is displayed if a motor error occurs in the Mando SPM Powertrain system. (See Section 19 for emergency procedures).
Note - Battery level
- The display does not indicate whether one or two batteries are installed in the vehicle. If two batteries are installed the level of charge displayed is the average between the two.
3.2.6 Switch Pack Controls
The switch packs on the vehicle's handlebars are used to control lights, indicators and the horn.
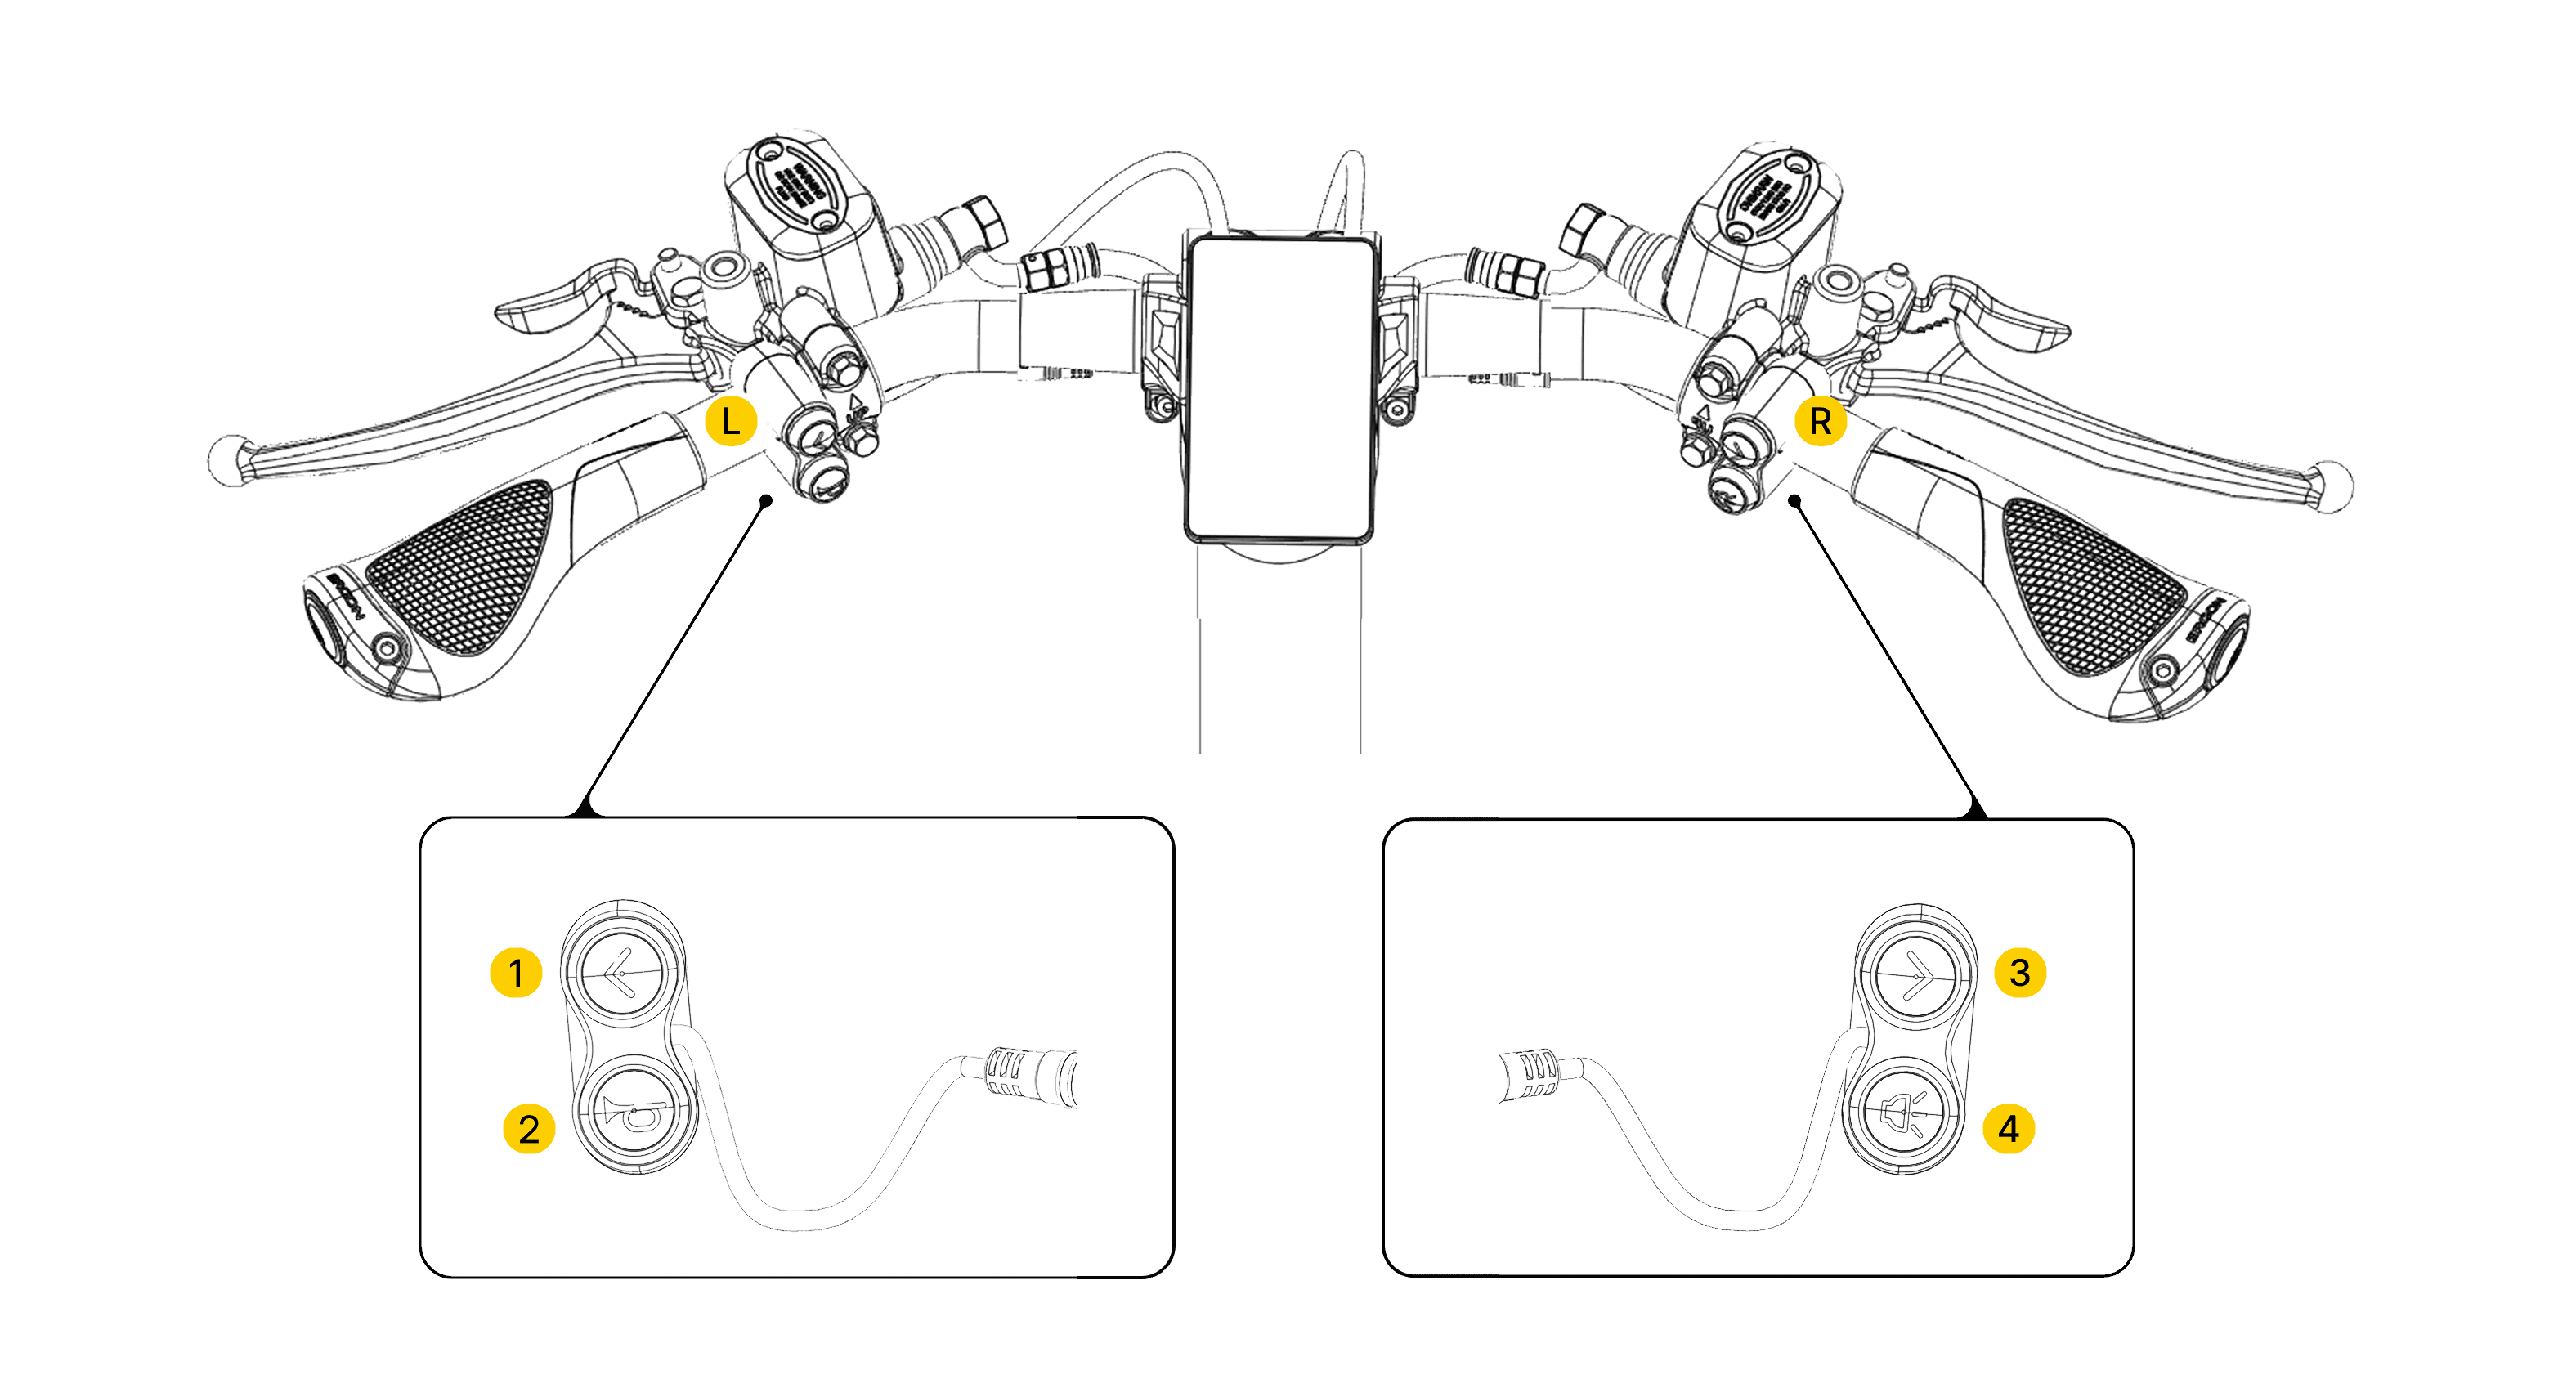

- Left indicator - Press to activate left indicator, press again to turn off.
- Right indicator - Press to activate right indicator, press again to turn off.
- Horn - Press and release to sound bell. Press and hold to sound louder horn.
- High Beam - Press and release to flash headlights. Press and hold to turn on high beam headlights. Press and hold again to turn off.
Note - Hazard Lights
- Press both left and right indicator buttons at the same time to activate hazard lights.
- Press both buttons again to deactivate hazard lights.
3.3 Battery System
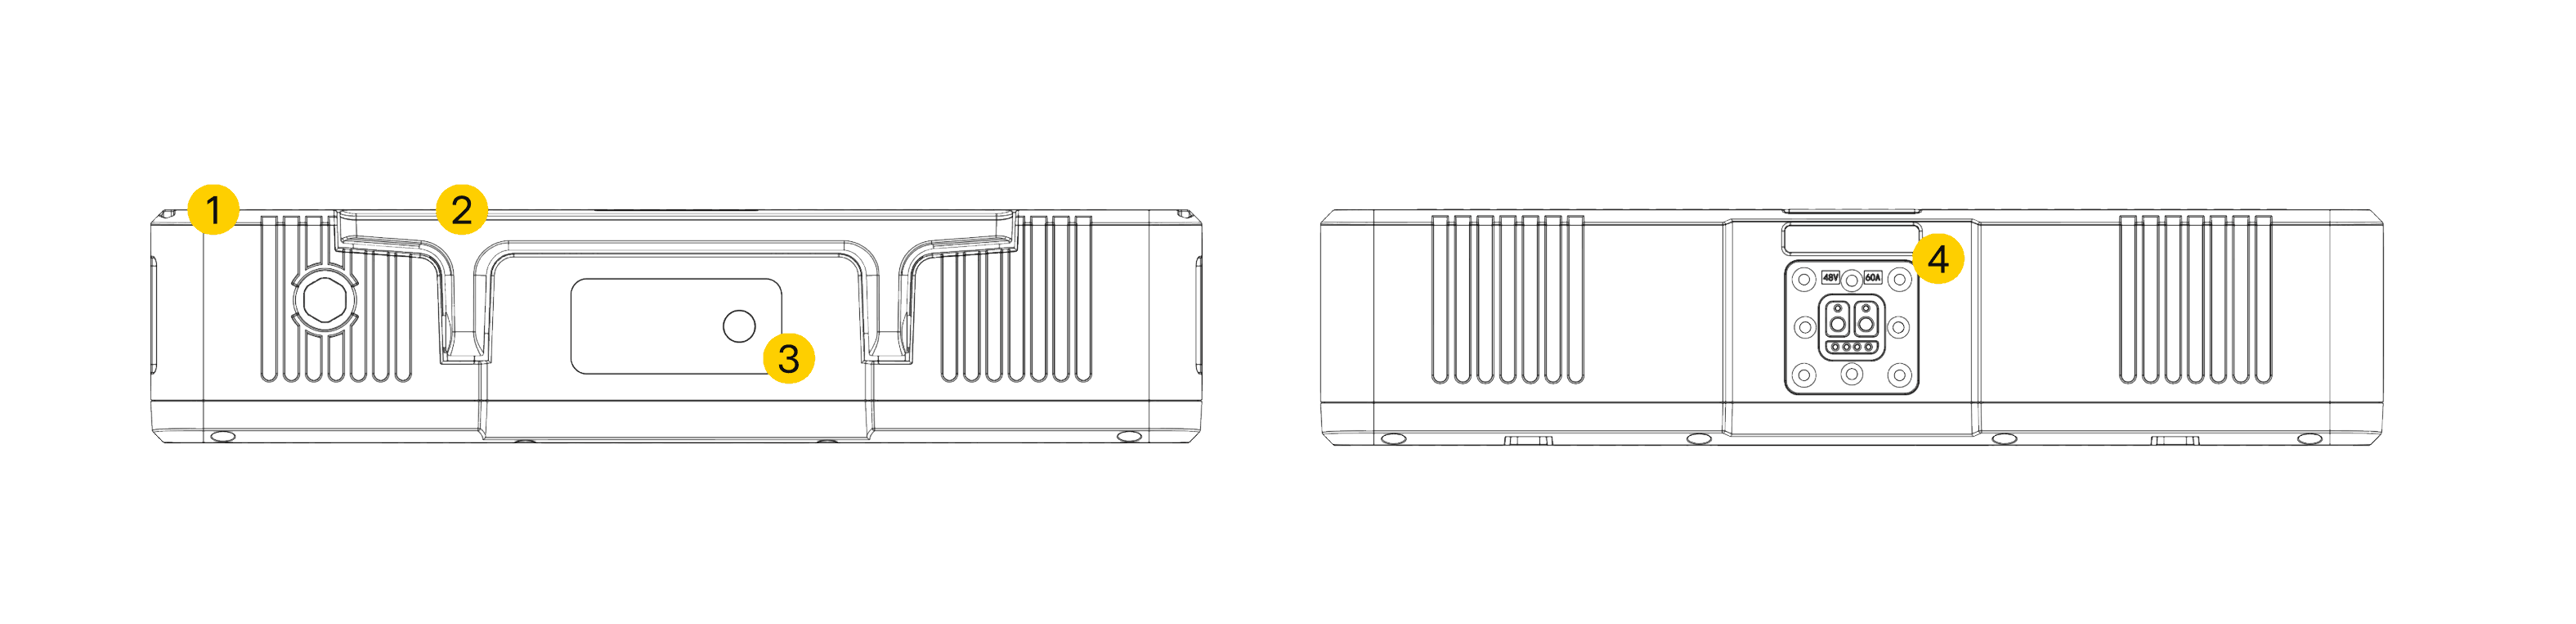
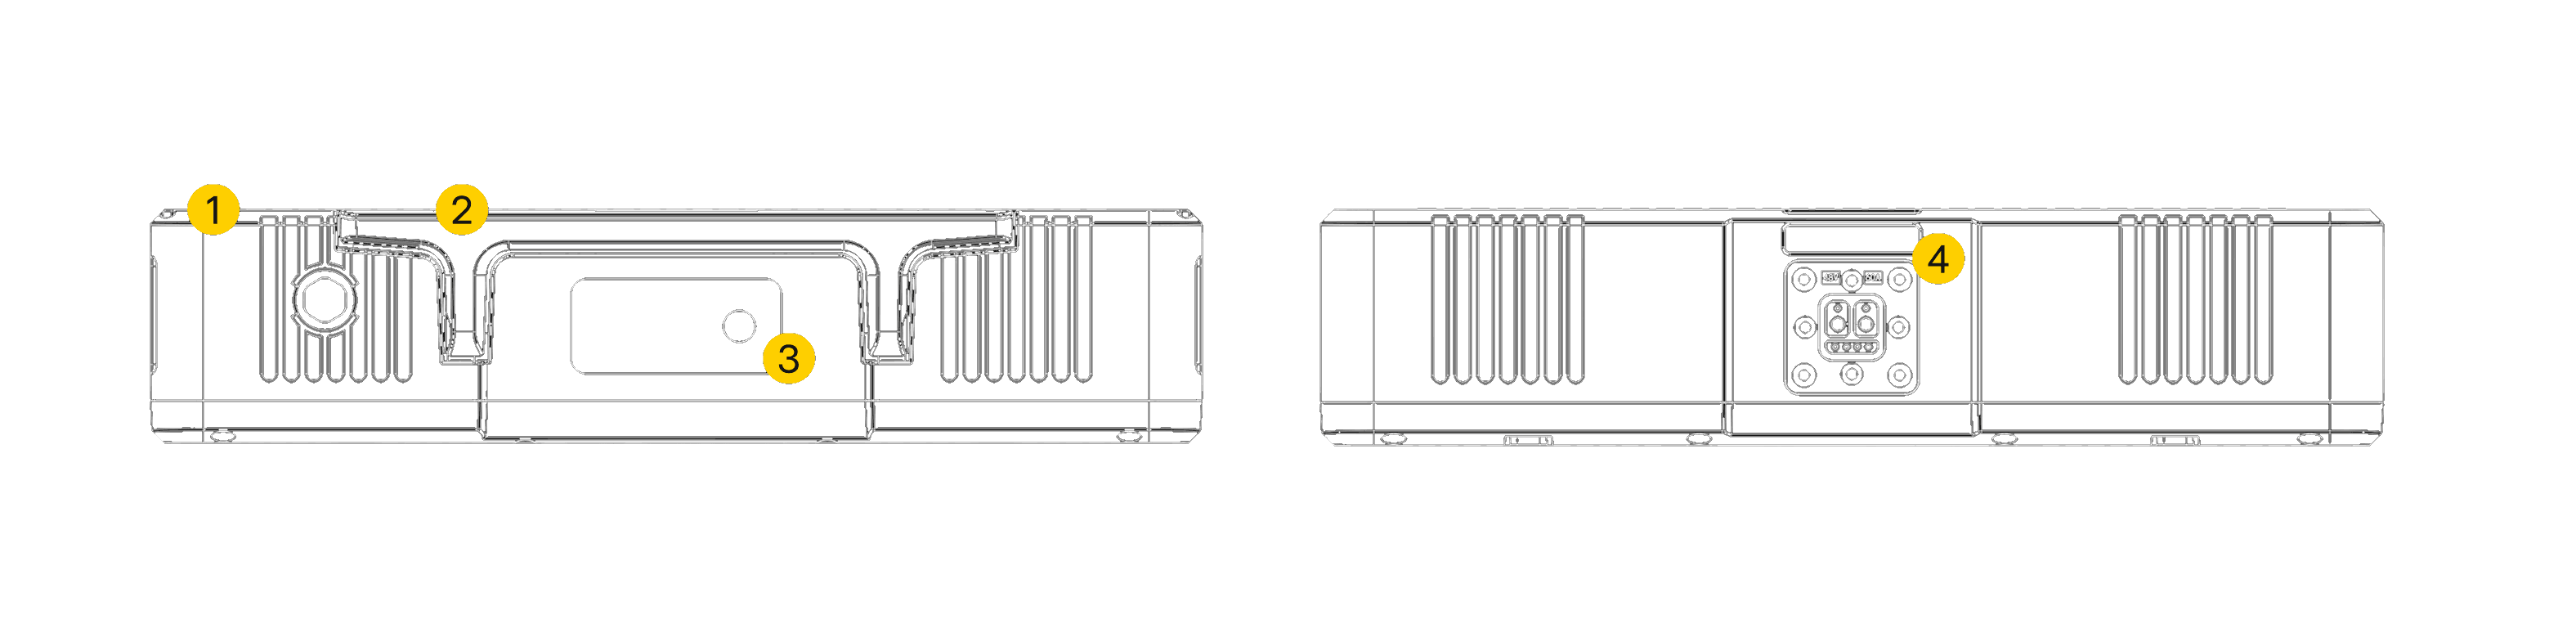
- Battery body
- Carrying handle
- Charge level screen & button
- Battery connection port
3.3.1 Inserting & Removing Battery

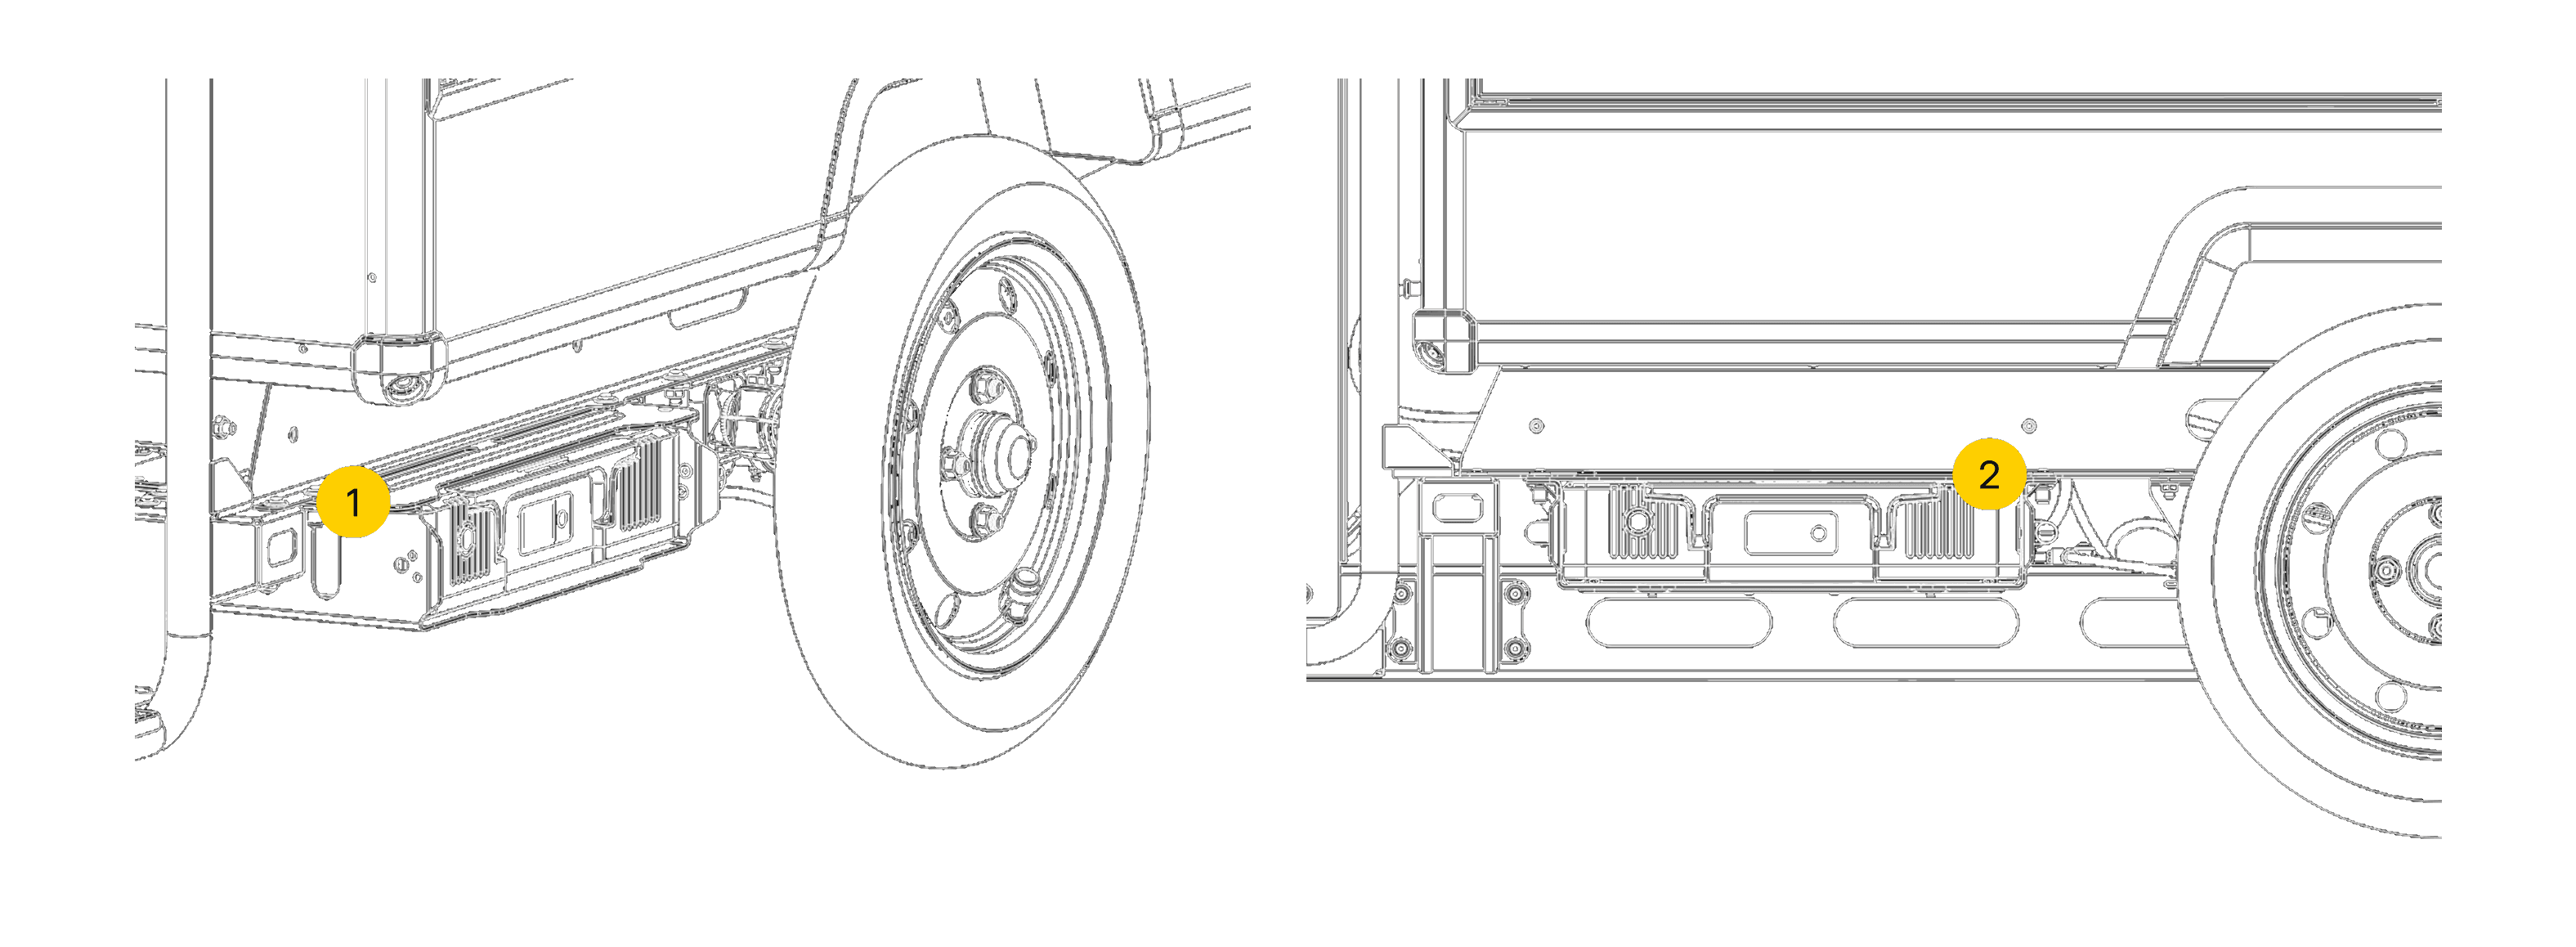
- Battery compartment
- Battery lock
Attention
Ensure the vehicle is powered off and in park before proceeding with battery insertion or removal.
Inserting Battery
Removing Battery
Warning
Electrical shocks - Shocks from electrical components are are dangerous. Serious injury or death may occur in the event of a faulty battery shock.
- Be sure to handle battery with care.
- Do not handle battery if water ingress on the charging port has occurred.
- If you are unsure how to charge a battery, please speak to a Minimal technical representative.
3.3.2 Charging a Battery
Note - Battery Charging
- The AES Superpack Smart batteries used in the Minimal Pedal 4 must be removed from the vehicle for charging.
- The battery packs should be charged using only the AES battery charger provided with the vehicle.
Warning
Electrical fires & shocks - Caused by incorrect charging conditions or water ingress on charger. Fires from electrical components are toxic and should not be extinguished with water fire extinguishers due to increasing the risk of shocks. Serious injury or death may occur in the event of a faulty battery.
- Be sure to handle battery with care.
- Be sure to check if the connection points are dry, there is no damage to the battery & that the battery is placed on the charging point correctly.
- If you are unsure how to charge a battery, please speak to a Minimal technical representative.